
The final year project is the one piece of work from your degree that people actually look at afterwards. It goes on your CV, it comes up in interviews, and for a lot of students it is the first time they build something end to end and defend it in front of people who know more than they do.
Which is why the most common FYP mistake is not choosing a project that is too hard. It is choosing a project that is too vague. A group picks something ambitious in September, spends three months deciding what it actually does, and starts building in February with no time left to fix anything.
This guide works the other way round. It starts with hardware platforms that definitely work, then shows what you can build on top of each one. The platform is not the project. What you make it do is the project.
Across most engineering departments in Pakistan, the marks split roughly four ways. Does it work, demonstrated live rather than on video. Did you do the engineering, meaning your own design decisions, calculations and code rather than a downloaded project. Can you defend it, which is where most groups lose marks. And is it documented, with a report that shows your methodology, testing and results.
Notice what is not on that list. Nobody gives extra marks for expensive hardware. A well executed project on a modest platform beats an ambitious one that half works, every single time.
Five questions to settle before you buy anything
Answer these honestly in your first two weeks and you will avoid most of the trouble that hits groups in March.
- What is the problem, in one sentence? If you cannot state it without using the word “system” twice, it is not defined yet. “A robotic arm that sorts objects by colour” is a problem. “An AI based automation solution” is not.
- What is your measurable outcome? Panels ask for numbers. Sorting accuracy over 50 attempts. Percentage energy gain against a fixed panel. Detection range in metres. Decide what you will measure before you build, because retrofitting measurement at the end never works properly.
- Who in your group writes code, and who builds hardware? Groups that never split this end up with four people watching one person debug. Assign it early.
- What is your total budget, including the things you will break? You will burn out at least one servo or motor driver. Budget for spares from the start rather than treating it as a crisis in April.
- What does your supervisor want to see? Some want novelty, some want rigour, some want a working demo above all else. Ask directly in the first meeting. It changes which project on this page is right for you.
Robotics and mechatronics: robotic arm projects
Robotic arms are the most popular FYP hardware in mechanical, mechatronics and electrical departments, and for good reason. An arm gives you kinematics, control theory, servo dynamics and, if you want it, computer vision, all in one platform. It is also visually obvious to a panel that it either works or it does not.
The important thing to understand is that an arm is a platform, not a project. “We built a robotic arm” is a weak defence. “We built a 4DOF arm that sorts three object types by colour with 92 percent accuracy across 50 trials” is a strong one.
Project ideas built on a 4DOF arm
- Colour or shape sorting system. Add a camera or a colour sensor, classify objects on a conveyor or a fixed table, and place each into the correct bin. Your measurable outcome is sorting accuracy and cycle time.
- Inverse kinematics demonstrator. Type or click a target coordinate and have the arm calculate its own joint angles to reach it. This is heavily mathematical, which suits supervisors who want theory rather than a gadget.
- Gesture or app controlled arm. Control the arm from a phone, a set of flex sensors on a glove, or hand tracking through a camera. Good for a group that wants a human interface component.
- Teach and repeat pick and place. Physically move the arm through a sequence, record the joint positions, then have it replay the motion. This is genuinely how industrial robots are programmed, which gives you a strong industry framing in the report.
Choosing between 4DOF and 6DOF
Four degrees of freedom is enough for pick and place on a flat surface. It is cheaper, lighter, easier to control and far easier to get working within a semester. Start here unless you have a specific reason not to.
Six degrees of freedom lets the arm approach an object from angles a 4DOF arm physically cannot reach, and it gives you wrist orientation. The cost is real: more servos, more torque management, more complex inverse kinematics and a noticeably harder debugging job. Choose 6DOF when your project genuinely requires orientation control, such as assembly tasks or approaching objects at an angle, and not because it sounds more impressive.
Our 4DOF robotic arm guide goes into the joint layout and servo selection in more detail if you want the mechanical side before deciding.
Both arms are sold in configurations, and the difference matters for your budget. The 4DOF is available as a complete kit with servos and an Arduino, as a chassis with SG90 or MG90 servos but no controller, or as a bare chassis with no motors at all. The 6DOF is offered with MG996R metal gear servos or without motors. If your lab already has servos and boards, the bare chassis option saves you a significant amount. If you are starting from nothing and want to be building rather than sourcing, take the complete kit.
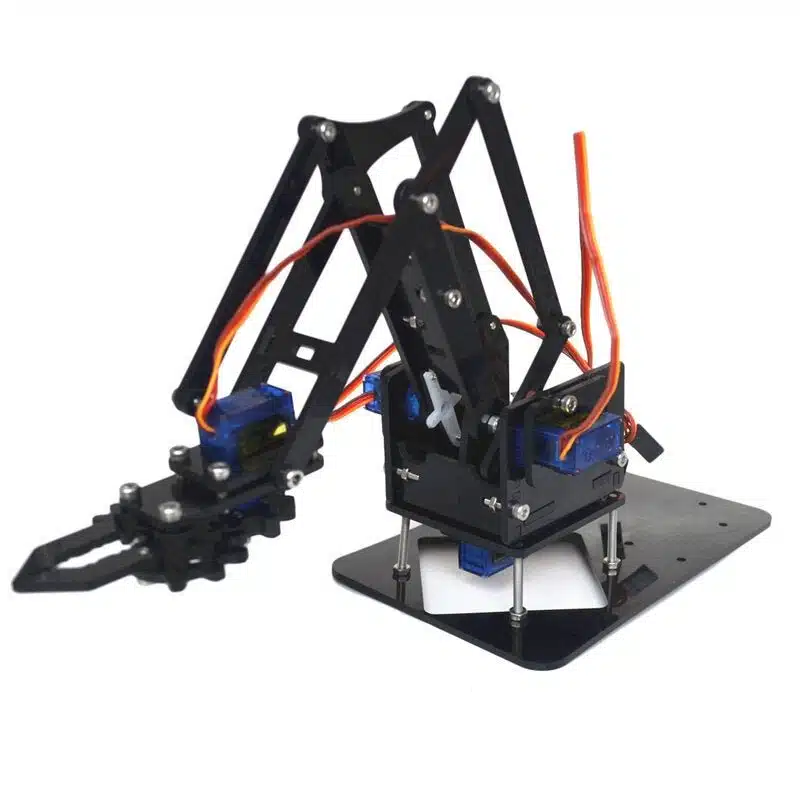
4DOF Acrylic Robotic Arm Chassis DIY Kit
Precision cut acrylic 4DOF arm, sold with or without servos and controller so you buy only what you need.
- Rotation, elevation, extension, gripper
- Works with Arduino or Raspberry Pi
- Options from bare chassis to complete kit

Mechanical Robotic Arm Chassis Kit (6DOF)
Anodised aluminium frame with hardened steel shafts and precision gears, rated for payloads up to 500 g.
- Full wrist orientation control
- With MG996R servos or bare chassis
- Takes grippers and end effectors
Renewable energy: solar tracking projects
Solar is a strong FYP area in Pakistan for an obvious reason. Energy is a live national problem, panels are everywhere, and a supervisor can see the relevance immediately. It is also one of the few project areas where you can produce clean quantitative results, which panels love.
A dual axis solar tracker uses light dependent resistors positioned around the panel to sense which direction the light is strongest, then drives two servos to tilt and rotate the panel toward it. That is a closed loop control system, which is the part that makes it an engineering project rather than a science model.
What to build on top of it
- Tracking versus fixed comparison study. Run a tracking panel and a fixed panel side by side over several days, log voltage from both, and quantify the energy gain. This is the single most defensible solar FYP because your entire result is a measured number.
- Algorithm comparison. Implement both LDR based sensing and time and date based astronomical tracking, then compare accuracy and power consumption. Strong for a report heavy department.
- IoT enabled monitoring. Add WiFi and push voltage, current and panel position to a live dashboard, with historical logging. Our guide on connecting Arduino to Firebase covers a straightforward way to get the data online.
- Weather adaptive control. Add temperature and humidity sensing and park the panel in a safe position under defined conditions, then justify the thresholds you chose.
The tracker kit is genuinely well specified for this. It ships with an Arduino UNO SMD board, two SG90 servos, a 6V 1W panel, four LDRs with resistors, a sensor shield and a digital tube display that shows live output voltage. Assembly needs no soldering. You will need two 18650 cells separately.
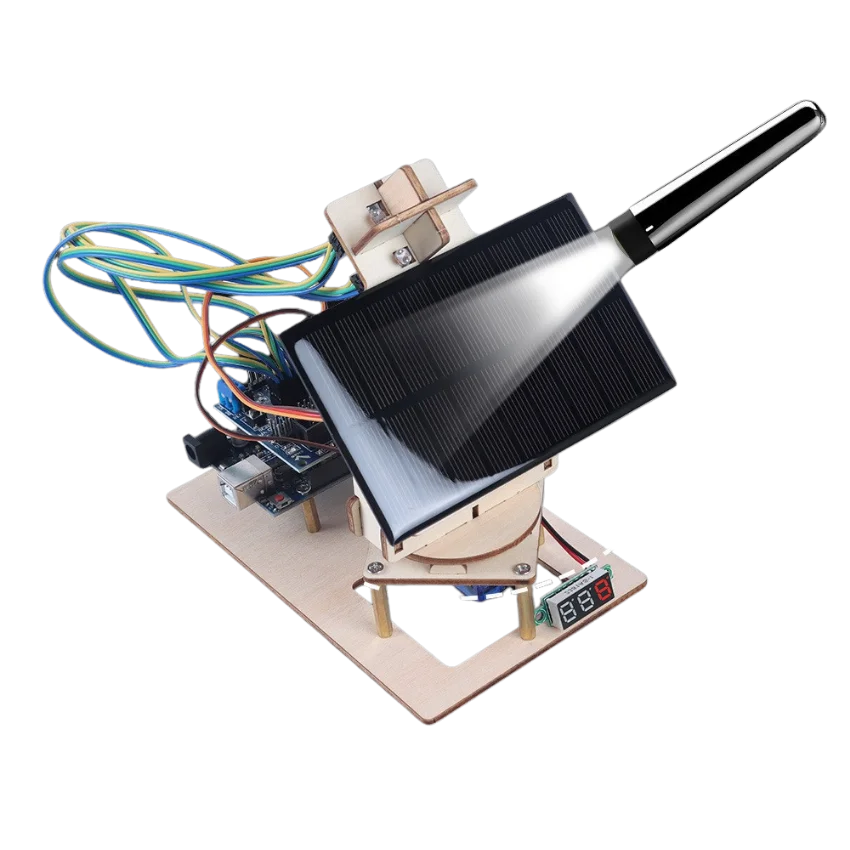
Smart Solar Tracker 2-Axis DIY Kit
A working dual axis tracker with live voltage display, so your results are measured rather than simulated.
- Closed loop LDR feedback control
- Arduino UNO and servos included
- Generates real power you can log
Computer vision and IoT: camera equipped robots
If your department wants something with a software and networking component, a vision equipped mobile robot covers more assessment criteria than almost anything else. You get embedded systems, wireless communication, image handling and autonomous control in a single build.
The ESP32 CAM platform is well suited to a Pakistani FYP specifically because the video stream runs through a browser rather than a custom app. That removes an entire app development workload you probably do not have time for, and it means your demo works on whatever laptop the panel has in the room.
Project directions
- Remote surveillance rover. Drive the robot over WiFi while streaming live video, with obstacle avoidance running underneath so it cannot be driven into a wall. Frame it around inspection of areas that are unsafe for people.
- Solar powered autonomous patrol. Use the onboard solar charging and tracking gimbal to argue for extended deployment without mains power. The energy angle gives you a second dimension to measure.
- Line following with vision verification. Combine the infrared tracking module with camera confirmation, and report on how the two sensing methods disagree under different lighting.
- Object detection rover. Push frames to a laptop or server running a detection model and have the robot respond to what it finds. This is where you can legitimately use the machine learning label, since the inference runs off board.
The kit includes the ESP32-CAM with an external antenna for range, a 4WD chassis with 200 RPM geared motors, an L298N driver, an HC-SR04 on a scanning servo, a solar panel on a photosensitive gimbal with a voltmeter, plus an 11.1V battery and charger. Programming is through the Arduino IDE in C++.
Autonomous navigation on a tracked platform
Wheeled robots slip. On a smooth exhibition floor, on gravel outside, or on any slightly uneven surface, a wheeled chassis loses traction exactly when a panel is watching. Tracks solve that by spreading contact area, and they turn by driving each track at a different speed, which is differential steering and worth a section in your report on its own.
The Panther tank platform is a good FYP base because it is deliberately over equipped. It carries an Arduino UNO, an L293D motor shield, an HC-SR04 on a servo that scans three directions, an HC-05 Bluetooth module, an IR remote and receiver, two infrared line tracking modules and an 8×16 LED matrix. That is four different input methods on one chassis, which means you can change direction mid project without buying new hardware.
Where to take it
- Multi mode autonomous navigation. Implement and compare obstacle avoidance, object following and line tracking on the same platform, then report on where each mode fails.
- Sensor fusion. Combine ultrasonic and infrared data to make better decisions than either sensor alone, and quantify the improvement. This is a genuinely strong FYP topic and the hardware is already there.
- Mapping and path planning. Log the ultrasonic sweep data as the robot moves and build a simple occupancy map, then implement basic path planning over it. Ambitious, but the payoff in defence is large.
- Search and rescue demonstrator. Frame it as a robot that navigates rubble to locate something, using the LED matrix for status indication. Good if your department likes applied social framing.
It is programmable in both Mixly visual blocks and the Arduino IDE. For an FYP you should be writing C++ and saying so, but the block environment is useful for quickly proving a behaviour before you commit to code. If you want more on picking between the sensors, our guide on choosing the right sensor for your Arduino or ESP32 project covers the trade offs.

ESP32 CAM Solar Robot Car Kit (4WD)
Live video to any browser, solar charging with a tracking gimbal, and ultrasonic obstacle avoidance in one platform.
- No app needed for the video stream
- Battery and charger included
- Expandable with OLED, GPS, buzzer

Bluetooth Panther Tank Chassis Kit
Metal tracked chassis with four control methods already on board, so your project direction is not locked in on day one.
- Bluetooth, IR, ultrasonic and line tracking
- Traction on uneven surfaces
- Arduino IDE and Mixly, no soldering
Higher end platforms: humanoid and single board computing
These two sit above the rest in both capability and cost. Neither is a first robot, and neither is necessary for a good FYP. Choose them when the project genuinely needs what they offer.
The 9DOF humanoid
Nine degrees of freedom across hip, knee and ankle joints, driven by digital servos on a composite biped chassis. What makes this a serious research platform rather than a toy is that bipedal walking is a genuinely hard control problem. You are dealing with gait design, balance, inverse kinematics across coupled joints and servo coordination, and none of it is solved for you.
Realistically this suits a university robotics lab, a competition team, or a strong final year group with a supervisor who works in control systems. Project directions include gait optimisation, static and dynamic balance strategies, obstacle response while walking, and motion sequencing. If your department has a robotics club or a lab budget, this is the kind of purchase that serves multiple cohorts rather than one project.
Raspberry Pi 5 for computation heavy projects
An Arduino controls hardware. A Raspberry Pi is a full computer running an operating system, which is a different tool for a different job. You need a Pi when your project involves on board image processing, running a machine learning model locally, hosting a web interface or dashboard from the device itself, handling a camera at real frame rates, or anything needing a screen and a desktop environment.
Many strong FYPs use both. The Pi handles vision and decision making, then sends commands to an Arduino that drives the motors and reads sensors in real time. That split is worth explaining in your report, because it shows you understand why each processor exists.
The complete kit covers the practical annoyances that eat a week of your project time: a 5V 5A USB-C supply that will actually run a Pi 5 under load, active cooling, a preformatted 32GB card, micro-HDMI cable, GPIO header extension for breadboarding, and the F240 component box. Our introduction to the Raspberry Pi is a good starting point if you have not used one before.

9 DOF Arduino Compatible Humanoid Robot
A programmable biped for gait design, balance control and inverse kinematics work.
- Nine digital servos, hip to ankle
- Sample code and wiring diagrams
- Suits labs and competition teams

Raspberry Pi 5 Complete Kit with F240 Box
Quad core Pi 5 with the power supply, cooling and storage that projects usually discover they are missing.
- 4GB or 8GB, 2.4 GHz Cortex-A76
- Active cooling and 5V 5A supply
- Dual camera connectors, 40-pin GPIO
Matching the platform to your department
| Platform | Core engineering content | Fits best with | Difficulty |
|---|---|---|---|
| 4DOF robotic arm | Kinematics, servo control, pick and place automation | Mechatronics, mechanical, electrical | Moderate |
| 6DOF robotic arm | Inverse kinematics, orientation control, payload handling | Mechatronics, robotics labs | High |
| Solar tracker | Closed loop control, energy measurement, sensor calibration | Electrical, energy, renewable systems | Low to moderate |
| ESP32 CAM rover | Embedded vision, WiFi streaming, autonomous navigation | Computer, software, electronics | Moderate |
| Tracked tank platform | Sensor fusion, path planning, differential drive | Electronics, mechatronics, computer | Moderate |
| 9DOF humanoid | Gait generation, balance, multi joint coordination | Robotics labs, competition teams | Very high |
| Raspberry Pi 5 | On board processing, vision, dashboards, ML inference | Computer science, software, AI focused | Moderate |
A realistic project timeline
Most FYPs run across two semesters. The failure pattern is almost always the same: too long spent planning, hardware ordered late, and integration left until the end. Integration is where everything breaks, so it needs the most buffer, not the least.
| Phase | What you should be doing | Common mistake |
|---|---|---|
| Weeks 1 to 3 | Define the problem and the measurable outcome, agree scope with your supervisor | Staying vague to keep options open |
| Weeks 3 to 5 | Order hardware, assemble it, get the manufacturer example running unmodified | Ordering late, or modifying before the baseline works |
| Weeks 5 to 10 | Build subsystems separately and test each one in isolation | Writing everything as one program from the start |
| Weeks 10 to 14 | Integrate subsystems, expect this to break things that worked alone | Not leaving buffer here |
| Weeks 14 to 17 | Run your measurement trials properly and record every result, including failures | Collecting data once, the day before submission |
| Final weeks | Write up, rehearse the demo, prepare for defence questions | Treating the report as an afterthought |
One rule that saves more projects than any other: get the unmodified example code running on your hardware before you write a single line of your own. If the manufacturer’s demo does not work, the fault is in your wiring or power, and finding that out in week four is cheap. Finding it out in week twelve, buried under your own code, is not.
Buy the platform, build the project
Some students worry that buying a kit undermines the project. It does not, provided you are honest about where the boundary sits. No engineer machines their own servos. What matters is that the design decisions, the control logic, the integration and the analysis are yours.
Where students do get caught out is claiming work they did not do. Say clearly in your report which parts were sourced and which you built. Panels respect that, and they will find out anyway.
- Keep a lab notebook from day one, dated, including everything that failed. It becomes your methodology chapter almost for free, and it is your evidence when the panel asks what you tried.
- Record video of the project working, early and often. Hardware fails on demo day. Video is not a substitute for a live demo but it proves the result existed.
- Buy spare servos and a spare motor driver at the start. These are the two things that die, and sourcing a replacement in April costs you a week.
- Check your power budget properly. Underpowered supplies cause the most confusing faults in student robotics, because the symptom is random misbehaviour rather than a clean failure.
- Label every wire. Two months in, nobody remembers which jumper goes where, and rebuilding a harness under deadline is miserable.
- Rehearse the defence with someone outside your group. If they cannot follow your explanation, the panel will not either.
- Prepare for the failure question. Every panel asks what does not work about your project. A group with a clear, honest answer scores better than one that insists everything is perfect.
Two things worth planning around. Several of these kits ship unassembled, which is intentional, since assembly is where you learn the mechanics and it is legitimate project work. Budget real time for it rather than assuming an afternoon. And check what your build needs beyond the box, particularly 18650 cells, which several kits require separately. If you are unsure what a specific project needs, ask us before ordering and we will tell you plainly.
If this level is a step too far
There is no benefit in buying above where you actually are. If your group has not worked with microcontrollers before, spending the first two months learning Arduino basics on FYP hardware is a bad use of the timeline.
Start instead with a sensor driven robot from our Intermediate Electronics Kits, which covers line followers, obstacle avoiders and starter kits, and get comfortable with the input, decision, output cycle first. Our guide to Arduino robot projects for class 9, 10 and O Level covers that ground, and if you want the board comparison first, the practical guide to Arduino and ESP32 projects for students explains where each platform fits.
Everything covered above sits in Advanced Robotics and Arduino Kits.
Frequently asked questions
What is a good final year project for engineering students in Pakistan?
The best FYP is one with a clearly defined problem, a measurable outcome and hardware you can actually get working within the timeline. Solar tracking with a measured efficiency comparison, a robotic arm doing automated sorting, and an autonomous rover with sensor fusion are all strong choices because each produces numbers you can defend rather than just a demonstration.
Is it acceptable to use a ready made kit for a final year project?
Yes, as long as you are clear about it. Kits provide the mechanical platform and basic components, which no engineer builds from raw material anyway. Your project is the design decisions, the control logic, the integration and the analysis. State in your report which parts were sourced and which you developed, and panels have no issue with it.
Should I use Arduino or Raspberry Pi for my final year project?
Use Arduino when the project controls motors and sensors with precise timing. Use a Raspberry Pi when you need on board image processing, a local machine learning model, a web dashboard or a display. Many strong projects use both, with the Pi handling processing and the Arduino handling hardware, and explaining that division is itself worth marks.
Do robotic arm kits include the servo motors?
It depends on the configuration you choose. Both the 4DOF and 6DOF arms are sold in several versions, ranging from a complete kit with servos and a controller down to a bare chassis with no motors. Check the options on the product page before ordering, and if your department already has servos, the bare chassis version will save you money.
How early should we order hardware for our FYP?
Within the first month, once your problem statement is agreed. Groups that order late lose weeks they needed for integration and testing, which is always where problems appear. Get the platform assembled and running the manufacturer’s example code before you begin your own development.
What is the difference between a 4DOF and a 6DOF robotic arm for a project?
A 4DOF arm handles pick and place on a flat surface, and is cheaper, lighter and considerably easier to control within one semester. A 6DOF arm adds wrist orientation so it can approach objects from angles a 4DOF cannot reach, at the cost of more servos, more torque management and harder inverse kinematics. Choose 6DOF only if your project genuinely requires orientation control.
Can you help if something in our project does not work?
Yes. Contact us with a photo of your wiring and a description of the behaviour, or bring the project to our shop on College Road in Rawalpindi. Most student robotics faults come down to power supply problems, a loose connection or a servo drawing more current than the source can deliver, and those are usually quick to identify in person.
Get the platform sorted early, spend your semester on the engineering
Robotic arms, solar trackers, vision rovers and single board computers for final year and semester projects. Delivery across Pakistan, and you are welcome to visit our shop on College Road, Rawalpindi to see the platforms before you commit. If you are unsure which one suits your project, tell us what you are building and we will advise honestly.
