
You have a K type thermocouple in hand, maybe a MAX6675 module too, and you want a number on the serial monitor that actually matches the temperature of your oven, furnace or soldering setup. The tricky part is not the probe. It is the tiny voltage it produces and the cold junction that most tutorials skip.
This post walks through the whole chain: what the thermocouple does, how to wire it, how to convert the reading into Celsius, how to check it with a multimeter, and how to fix wrong or drifting readings. We keep it practical, the way we explain it to students who walk into our shop on College Road.
How do I use a K type thermocouple to measure temperature?
To use a K type thermocouple, connect it to a thermocouple amplifier such as the MAX6675 module, wire the module to your Arduino over SPI, and read the temperature in code with cold-junction compensation. The probe alone gives a tiny voltage, so the amplifier is what makes the reading usable in Celsius.
What is a K type thermocouple and how does it produce a voltage?

A K type thermocouple is two different metal wires joined at one end. When that junction is hotter or colder than the other end, it produces a small voltage, called the Seebeck effect. The voltage rises with the temperature difference, so the probe itself has no electronics inside it.
The K type pair is nickel-chromium and nickel-aluminium. That is why it is so common: it is cheap, tough, and covers a very wide range. Our K Type Thermocouple is rated from -200°C to 1372°C, which covers ovens, kilns, furnaces and most lab work.
The catch is the voltage. At room temperature the output is only a few microvolts per degree, far too small for an Arduino analog pin to read directly. That is the whole reason an amplifier module exists.
What do I need to read a K type thermocouple with Arduino?
You need three things: the thermocouple probe, a thermocouple-to-digital module, and a microcontroller. Jumper wires and a breadboard help, and a display is optional but useful.
- Thermocouple: a bare K Type Thermocouple (Rs. 250) or a stainless-steel PT100 Thermocouple K-Type Temperature Probe 0-800°C (0.5 meter) (Rs. 350) if you want a probe that can sit in a flame or an oven.
- Amplifier: the Arduino Nano V3 Board Type-C (Pre-Soldered) (Rs. 800) or any Uno-style board. The Nano is small enough to fit inside a project box.
- Optional: a 7x7mm DPDT Self Lock Type On/Off Switch (Rs. 20) if you want a proper on/off button on the enclosure.
Everything here sits in our Boards, Modules and Accessories range, and we ship across Pakistan at a flat Rs. 350.
How do I connect a K type thermocouple to an Arduino?
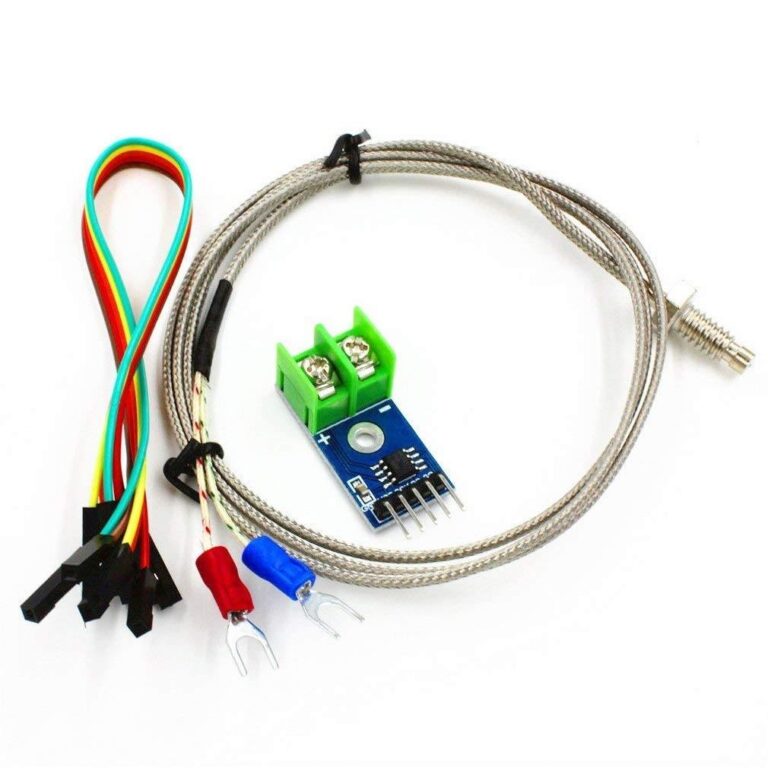
Wire the thermocouple to the MAX6675 module first, then the module to the Arduino. The thermocouple screws into the module’s terminal block, and the module connects to the Arduino with five wires.
- Thermocouple to module: the red wire goes to the + terminal, the yellow (or blue) wire to the – terminal. The screw terminal is polarity-sensitive, so check it twice.
- Power: module VCC to Arduino 5V, module GND to Arduino GND.
- Data: module SO to Arduino D4, module CS to Arduino D5, module SCK to Arduino D6. Those are the usual pins, but you can change them in code.
- Keep it short: use jumper wires under about 20 cm between module and board, and keep the thermocouple leads away from motors, relays and mains wiring.
On a Nano, the pins are labelled on the silkscreen, so you do not need to count. On an Uno, the same pin numbers work.
Why do I need a cold junction or amplifier module?
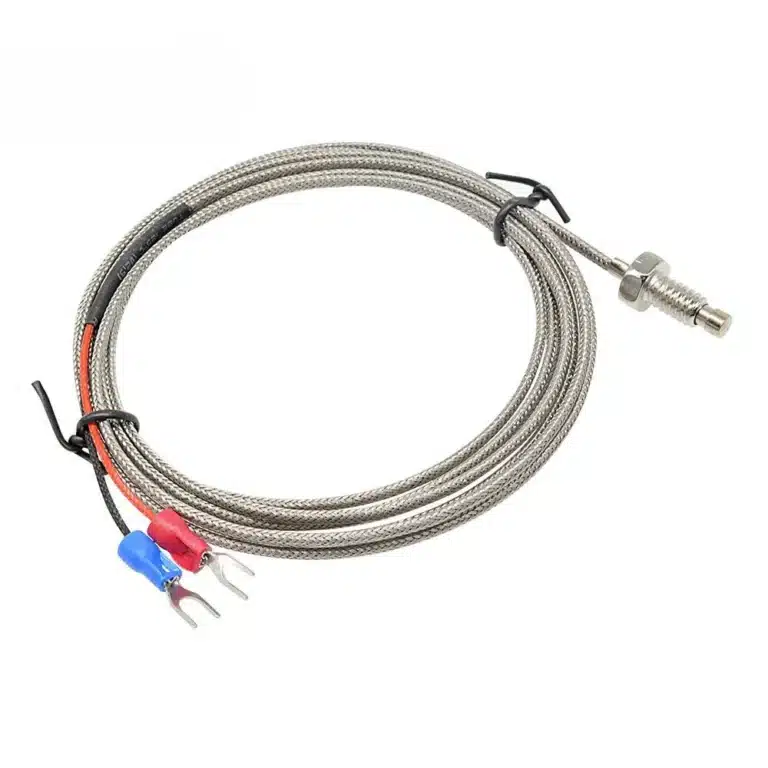
Because a thermocouple measures the difference between the hot junction and the cold junction, not the absolute temperature. The cold junction is where the thermocouple wires meet the copper terminals on your board, and that spot sits at room temperature, not at 0°C.
If you ignore the cold junction, every reading will be off by roughly the room temperature. A probe in a 200°C oven would read around 170°C on a hot afternoon. The MAX6675 module handles this for you: it measures its own board temperature and adds the correction automatically, which is why we recommend it for students.
If you try to read the raw thermocouple voltage with an op-amp and the Arduino ADC, you have to do the cold-junction maths yourself, and the tiny signal picks up noise easily. For most projects, the module is the right call.
How do I convert the reading into degrees Celsius?

With the MAX6675, the library does the conversion for you. Install the Adafruit MAX6675 library from the Arduino Library Manager, then read the temperature with a single call.
#include <max6675.h>

int SO = 4, CS = 5, SCK = 6;
MAX6675 thermocouple(SCK, CS, SO);

void setup() {
 Serial.begin(9600);
 delay(500);
}

void loop() {
 Serial.print("Temp: ");
 Serial.print(thermocouple.readCelsius());
 Serial.println(" C");
 delay(1000);
}
The module returns Celsius directly, already cold-junction compensated. The MAX6675 module is rated from 0°C to 1024°C, so it is fine for ovens, hot plates and kilns. If you need readings below 0°C, use a MAX31855 instead, which handles negative temperatures.
Add a moving average of the last few readings if the number jumps around. A simple average of five samples smooths the display without hiding real changes.
How do I check the thermocouple with a multimeter?
Set the multimeter to millivolts DC and measure across the two thermocouple wires while the probe is at room temperature. You should see a small voltage in the low millivolt range, and it should rise when you warm the tip between your fingers.
You can also check continuity: the two wires should read close to zero ohms at the junction end. An open circuit means a broken probe, and a short means the wires are touching where they should not. Our guide on how to check a K type thermocouple with a multimeter walks through the exact steps and expected readings.
If the multimeter shows nothing at all, the probe is dead. Replace it before blaming the code.
What causes wrong or drifting readings and how do I fix them?
Most wrong readings come from wiring, grounding or the cold junction, not from the probe. Work through these in order before you change the code.
| Symptom | Likely cause | Fix |
|---|---|---|
| Reading stuck near room temperature | Thermocouple wired backwards or loose in the terminal | Swap the red and yellow wires, tighten the screws |
| Reading jumps by tens of degrees | Noise from motors, relays or long unshielded leads | Shorten leads, move away from power wiring, add averaging |
| Reading always a few degrees low | Module sitting near a heat source or in a hot box | Keep the module at ambient temperature, away from the oven body |
| Reading drifts slowly over hours | Cold junction not stable, or probe ageing | Ventilate the enclosure, replace the probe if it is old |
| Reading reads 0 or 1024 | Open thermocouple or module not powered | Check 5V and GND, reseat the probe |
For calibration, compare against a known reference such as boiling water (about 100°C at sea level, a little lower in Rawalpindi’s altitude) or an ice bath. If the offset is small and constant, subtract it in code. If it changes with temperature, the module or the probe is the problem.
K type thermocouple vs PT100: which should I use?
Use a K type for high temperatures and fast response; use a PT100 for accuracy around room temperature. They solve different problems.
- K type thermocouple range: roughly -200°C to 1372°C, cheap, rugged, fast, but needs cold-junction compensation and is less accurate at low temperatures.
- PT100: a platinum resistance sensor, very stable and accurate near room temperature, but slower and usually limited to a few hundred degrees.
- K type thermocouple uses: kilns, furnaces, ovens, engine exhaust, hot plates, soldering reflow, and any project where the tip must survive serious heat.
If your project is a fridge monitor or a room sensor, a PT100 or a digital sensor is easier. If it is a furnace controller, the K type wins.
Which projects in Pakistan use K type thermocouples most?
In our experience, most student and workshop projects here use K type thermocouples for heat, not for room temperature. The common ones are furnace and kiln controllers, reflow ovens for SMD soldering, hot plate and heater control, and engine or exhaust temperature logging.
Power stability matters too. If your project runs from mains, use a proper 5V supply for the Arduino and keep the thermocouple wiring away from the mains side. A small buck or boost converter from a stable source is safer than a phone charger that dips under load.
For a display, a small LCD or OLED module makes the reading visible without a laptop. If you are building the whole project from scratch, our boards and programmers range has the controller side covered.
Frequently asked questions
How do I connect a K type thermocouple to an Arduino to measure temperature?
Connect the thermocouple to a MAX6675 module, then wire the module to the Arduino: VCC to 5V, GND to GND, SO to D4, CS to D5 and SCK to D6. Install the Adafruit MAX6675 library and call readCelsius() in your loop. The module handles cold-junction compensation, so the number you see is the actual temperature in Celsius.
What is the temperature range of a K type thermocouple?
A bare K type thermocouple is rated from -200°C to 1372°C. The MAX6675 module limits the usable range to 0°C to 1024°C because of the chip inside it. For negative temperatures, use a MAX31855 module instead, which supports readings below zero.
Do I need an amplifier module for a K type thermocouple?
Yes, for Arduino work you do. The thermocouple produces only microvolts per degree, far too small for the ADC to read reliably. A module like the MAX6675 amplifies the signal, converts it to digital over SPI and applies cold-junction compensation, which makes the reading accurate and easy to use.
Why is my thermocouple reading wrong or drifting?
The usual causes are reversed thermocouple wires, a loose terminal, noise from motors or relays, or the module sitting near a heat source. Check polarity first, shorten the leads, keep the module at ambient temperature and average a few samples in code. If the probe reads open circuit on a multimeter, replace it.
Can I use a K type thermocouple with a Raspberry Pi?
Yes. The MAX6675 module uses SPI, which the Raspberry Pi supports, so you can read it with a Python library. Use 3.3V-safe wiring and level shifting if needed, and keep the thermocouple leads short. The same cold-junction principle applies, so the module still does the correction for you.
Where can I buy a K type thermocouple in Pakistan?
We stock the K Type Thermocouple, the MAX6675 module with sensor, and a stainless-steel K type probe at College Road Electronics in Rawalpindi. We deliver nationwide across Pakistan at a flat Rs. 350 shipping rate, and we are happy to help students pick the right probe for their project.
