
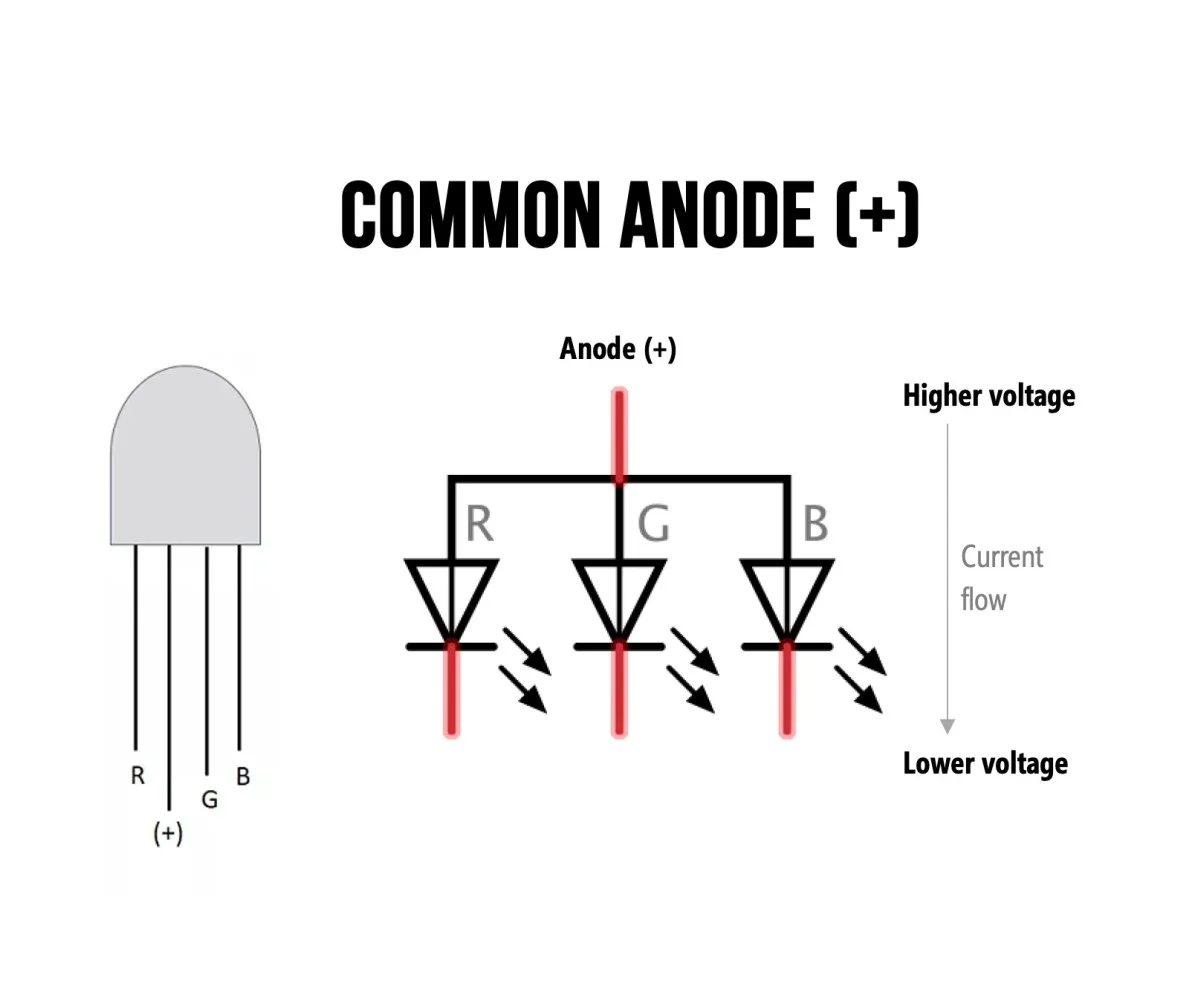

The RGB Tri-Color Common Anode LED 4-Pin (5mm) is a versatile light-emitting diode that combines Red, Green, and Blue (RGB) LEDs within a single 5mm package. By controlling the intensity of each color channel, this LED can produce a wide spectrum of colors, making it ideal for decorative lighting, status indicators, Arduino projects, electronic learning, and creative DIY applications.
This LED features a Common Anode configuration, where the positive terminal is shared among all three color LEDs. The individual Red, Green, and Blue pins are controlled separately, allowing precise color mixing through digital outputs or PWM (Pulse Width Modulation) signals from microcontrollers.
Key Features of RGB Tri-Color Common Anode LED
- Bright RGB Tri-Color LED in a compact 5mm package
- Common Anode configuration for easy interfacing
- Four-pin design with separate Red, Green, and Blue control pins
- Capable of producing millions of color combinations
- Suitable for Arduino, Raspberry Pi, and microcontroller projects
- Low power consumption
- Fast switching response
- Long operational lifespan
- Ideal for decorative, educational, and indicator applications
Technical Specifications
- Product Type: RGB LED
- LED Type: Tri-Color
- Configuration: Common Anode
- Package Size: 5mm
- Number of Pins: 4
- Colors: Red, Green, Blue
- Lens Type: Clear / Diffused (varies by model)
- Operating Voltage:
- Red: Typically 1.8V – 2.2V
- Green: Typically 2.8V – 3.3V
- Blue: Typically 2.8V – 3.3V
- Forward Current: Typically 20mA per color
- Viewing Angle: Varies by manufacturer
- Mounting Type: Through-Hole
- Operating Temperature: Depends on manufacturer specifications
Pin Configuration and Wiring
The RGB Tri-Color Common Anode LED consists of four pins that enable independent control of each color channel:
- Common Anode (+)
- Red Cathode (-)
- Green Cathode (-)
- Blue Cathode (-)
To illuminate a specific color, connect the common anode to the positive supply voltage and drive the desired color pin LOW through an appropriate current-limiting resistor. This configuration is ideal for microcontroller projects where GPIO pins can sink current to control each color independently.
How RGB LED Color Mixing Works
An RGB LED contains three individual LEDs – Red, Green, and Blue – inside a single package. By varying the brightness of each color using PWM signals, different colors can be generated through additive color mixing.
Color Mixing Examples
- Red + Green = Yellow
- Red + Blue = Magenta
- Green + Blue = Cyan
- Red + Green + Blue = White
This allows a single LED to create a wide range of lighting effects and color patterns. By adjusting the PWM duty cycle for each color channel, you can achieve virtually any color in the visible spectrum, from subtle pastels to vibrant saturated hues.
Applications of RGB Common Anode LED
- Arduino projects and microcontroller experiments
- Raspberry Pi projects and IoT devices
- DIY electronics projects and prototyping
- RGB lighting effects and color-changing displays
- Status and notification indicators
- Educational electronics experiments and STEM learning
- Decorative lighting systems and ambient lighting
- Mood lighting applications for home and workspace
- Interactive displays and user interfaces
- Color mixing demonstrations and visual effects
- Smart home lighting controls
- Gaming peripherals and PC modding
Advantages of Using RGB LED 5mm
- Multiple colors from a single LED component
- Simple control using microcontrollers and Arduino boards
- Energy efficient operation with low power consumption
- Compact and lightweight design saves board space
- Long service life with minimal degradation
- Suitable for PWM brightness control and smooth transitions
- Easy breadboard and PCB integration
- Cost-effective solution for multi-color lighting needs
- Wide availability and compatibility with standard components
Usage Tips and Best Practices
- Always use a current-limiting resistor with each color pin to prevent LED damage
- Verify the common anode pin before wiring to avoid incorrect connections
- Use PWM outputs for smooth color transitions and brightness control
- Avoid exceeding the maximum forward current rating of 20mA per color
- Suitable for both breadboard prototyping and permanent PCB installations
- Calculate appropriate resistor values based on your supply voltage and desired brightness
- Test each color individually before implementing complex color mixing
- Consider using transistors or LED drivers for higher current applications
- Protect the LED from static discharge during handling and installation
Why Choose RGB Tri-Color Common Anode LED
The RGB Tri-Color Common Anode LED 4-Pin (5mm) offers unmatched versatility for hobbyists, makers, and electronics enthusiasts. Its common anode configuration makes it particularly suitable for microcontroller projects where sinking current is easier than sourcing. The compact 5mm form factor allows for dense LED arrays and space-constrained designs.
Whether you’re building an Arduino-based mood lamp, creating visual feedback for IoT devices, or teaching electronics principles, this RGB LED provides an affordable and reliable solution. The ability to generate millions of colors from a single component simplifies circuit design and reduces component count.
Getting Started with Your RGB LED Project
To begin using your RGB Tri-Color Common Anode LED, you’ll need a microcontroller (such as Arduino or Raspberry Pi), three current-limiting resistors (typically 220-330 ohms), and a breadboard for prototyping. Connect the common anode to your positive voltage supply, and connect each color cathode to a GPIO pin through its resistor.
Use PWM-capable pins on your microcontroller to achieve smooth color transitions and brightness control. Start with simple examples like cycling through primary colors, then progress to more complex effects like rainbow fades, breathing effects, or responsive lighting that reacts to sensors.
Note: Images are for Illustration Purposes Only.





Reviews
There are no reviews yet