
Overview
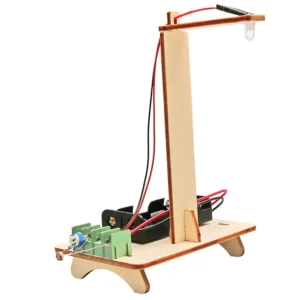
The T-M52 Imaging of Small Holes DIY Learning Kit is an educational pinhole imaging kit that teaches the fundamentals of light propagation, image formation, and basic optics. Students assemble a compact optical housing and pinhole plate to project real-world images onto a translucent screen, making abstract physics concepts visible and easy to understand.
Key Features and Benefits
- Demonstrates light propagation: Visualize how light travels in straight lines to form images through a small aperture.
- Pinhole imaging principles: See how a small hole projects an inverted image and how aperture size affects sharpness and brightness.
- STEM learning tool: Integrates physics, optics, and hands-on experimentation for students and hobbyists.
- Easy assembly: Beginner-friendly DIY construction with all parts included; no electricity or special tools required.
- Reusable components: Durable materials allow repeated demonstrations and extended classroom use.
What the Kit Includes
- Main optical housing components
- Light shield or box structure
- Pinhole plate / small aperture disc (multiple aperture sizes)
- Projection screen or translucent sheet
- Assembly fittings (screws, connectors, supports)
- Instruction manual and assembly guide with experiment suggestions
How to Use and Suggested Experiments
Follow the included assembly guide to build the optical housing, install the pinhole plate, and position the projection screen. Once built, try these experiments to explore optical concepts:
- Vary aperture size: Swap different pinhole plates to see how hole diameter changes image sharpness and brightness.
- Change object distance: Move the kit closer to or further from the viewed object to observe inversion, focus, and image size variations.
- Measure and record: Measure distances and record observations to relate image size to distance using simple geometric optics principles.
- Compare to lenses: Use the kit alongside lenses or camera modules to contrast pinhole imaging with lens-based imaging.
Classroom Activities
- Demonstrate why images are inverted through small apertures and how resolution depends on aperture size.
- Assign lab reports where students plot image size versus distance to reinforce the geometry of light rays.
- Use as a science fair project to showcase experiments with quantitative results and visual proof.
Learning Outcomes
- Understand basic light propagation and ray behavior
- Explain pinhole imaging and why images appear inverted
- Relate aperture size and distance to image clarity and brightness
- Develop experimental skills: observation, measurement, and hypothesis testing
Specifications
- Concept focus: Light propagation, image formation, optical imaging
- Material: Plastic or cardboard components
- Assembly type: DIY unassembled kit
- Skill level: Beginner-friendly
- Learning focus: Physics of light, imaging, and visual science
- Power requirement: None (purely optical experiment)
Assembly and Safety
- All parts are designed for safe, tool-free assembly. Follow the instruction manual for step-by-step guidance.
- Keep small components away from very young children to avoid choking hazards.
- Use the kit in a dim or controlled light environment for best projection results.
Ideal For
- Classroom demonstrations and hands-on lessons in physics and optics
- Science fairs and student projects with measurable outcomes
- Homeschool STEM activities and curious learners exploring imaging concepts
Teaching Tips
- Encourage students to form hypotheses before changing aperture size or distance.
- Have students sketch projected images and label ray paths to reinforce ray model concepts.
- Introduce simple equations relating image distance and object distance for advanced classes.
Note: Images are for illustration purposes only.
Category: DIY School Kits


Reviews
There are no reviews yet