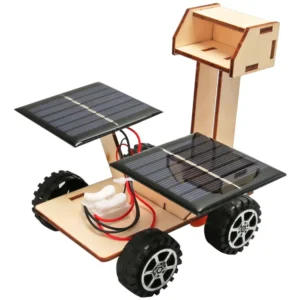
Understand Solar Energy by Building a Real Tracker
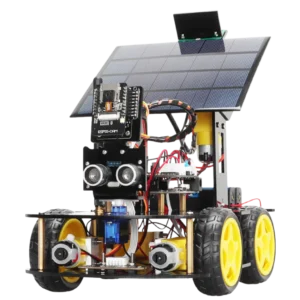
The Smart Solar Tracker Kit bridges the gap between classroom theory and real-world renewable energy engineering. Instead of reading about how solar panels work, you build a functional dual-axis tracking system that physically orients a solar panel toward light, generates electricity, and displays the voltage in real time. It’s one of the most effective ways to teach photovoltaic concepts, servo motor control, analog sensor reading, and closed-loop control systems, all in a single affordable project.
How the Tracking Works
The kit uses photosensitive resistance sensors (light-dependent resistors) positioned around the solar panel to detect light intensity from different directions. The Arduino reads these analog values, compares them, and drives two servo motors to tilt and rotate the panel toward the brightest light source. This creates a closed-loop feedback system, the same principle used in commercial solar tracking installations, scaled down to a desktop-friendly educational platform.
Real Power Generation with Live Monitoring
The onboard solar panel doesn’t just demonstrate the concept. It actually generates electricity that charges the 18650 battery. The micro digital tube display shows the real-time voltage output, giving you immediate visual feedback on how panel orientation affects energy generation. Tilt the tracker away from the light and watch the voltage drop. Let the auto-tracking algorithm take over and watch it climb back up. This tangible cause-and-effect demonstration makes abstract electrical concepts concrete and memorable.
Progressive Learning Path
The kit includes multiple tutorial projects organized from simple to complex. Start with basic exercises like reading a single light sensor value or controlling one servo motor. Progress to combining sensors for directional detection. Build up to the full solar tracking algorithm that integrates all components into an autonomous system. Each project builds on the previous one, creating a structured learning path that’s ideal for self-study or classroom instruction.
Clean Build, Easy Assembly
The laser-cut wooden frame pieces fit together precisely, giving the finished tracker a clean, professional appearance. Assembly requires no soldering and no special tools. The wiring uses standard dupont jumper cables that plug directly into the Arduino and sensor modules. From unboxing to a working solar tracker, most builders complete the project in a single session.
Expandable for Advanced Projects
Once you’ve mastered the core solar tracking functionality, the Arduino platform lets you extend the project in any direction. Add a temperature and humidity sensor to log environmental data alongside voltage output. Connect an LCD display for more detailed readouts. Integrate WiFi or Bluetooth to send tracking data to your phone. Use the kit as the foundation for a science fair project, an IoT weather station, or a proof-of-concept for a larger solar installation.
Specifications
| Microcontroller | Arduino UNO compatible |
| Tracking Axes | Dual-axis (2 servo motors) |
| Light Sensors | Photosensitive resistance (LDR) |
| Display | Micro digital tube (LED segment) |
| Solar Panel | 5V (charges 18650 battery) |
| Frame Material | Laser-cut wood / plywood |
| Programming | Arduino IDE (C language) |
| Battery Required | 1× 18650 3.7V (not included) |
| Skill Level | Beginner to intermediate |
| Assembly | No soldering, plug-in wiring |
What’s in the Box
- Arduino UNO compatible board
- 2× SG90 servo motors (dual-axis)
- Solar panel (5V)
- Photosensitive resistance sensor modules (LDR)
- Micro digital tube voltage display
- Laser-cut wooden frame pieces
- Solar charging module
- All wiring cables and mounting hardware
- Assembly guide and Arduino source code with multi-project tutorials


Reviews
There are no reviews yet