Overview
Interfacing Arduino with I2C LCD Display is a beginner-friendly project that lets you show text, numbers, menus, and real-time sensor data using a standard character LCD with an I2C adapter. By using the I2C protocol you reduce wiring and free up Arduino GPIO pins, connecting the display with only two signal lines: SDA and SCL.
Key Features
- Simplified 2-wire communication using I2C (SDA, SCL).
- Compatible with 16×2 and 20×4 character LCD modules.
- Works with Arduino UNO, MEGA, Nano and other boards that support I2C.
- Only two Arduino pins required, leaving pins available for sensors and modules.
- Adjustable contrast via a built-in potentiometer on the I2C adapter board.
- Supported by the LiquidCrystal_I2C and Wire libraries in the Arduino IDE.
- Ideal for displaying real-time sensor readings, menus, and status messages.
Compatible Displays and Boards
Displays
- 16×2 character LCD (HD44780 compatible)
- 20×4 character LCD (HD44780 compatible)
Arduino Boards
- Arduino UNO
- Arduino MEGA
- Arduino Nano
- Other AVR and ARM-based boards with I2C support
Wiring and Connections
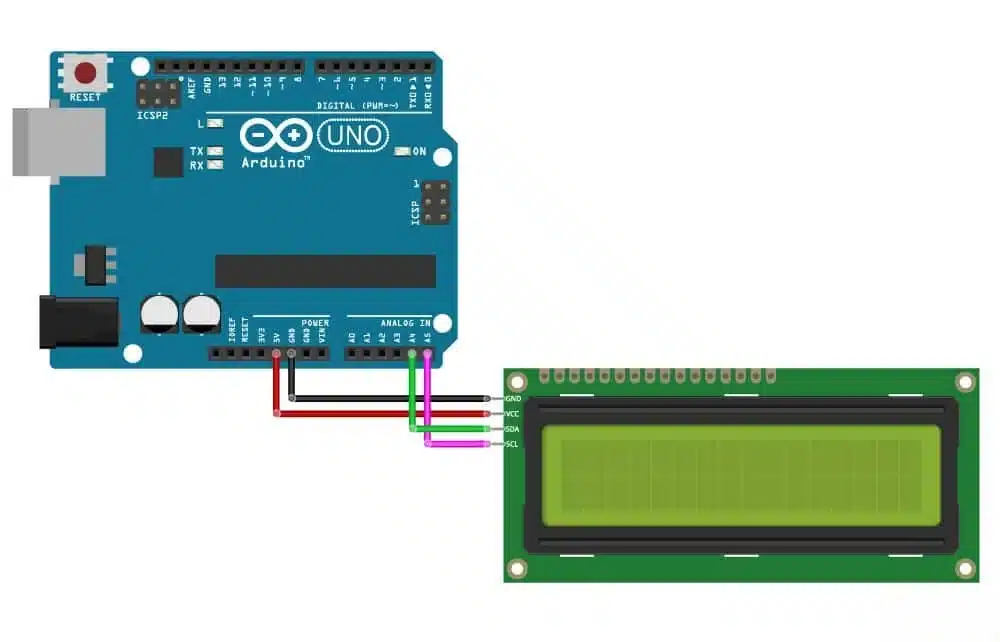
Wiring an I2C LCD is simple. Connect the I2C adapter pins to your Arduino as follows:
- VCC to 5V (or 3.3V if your module supports it)
- GND to GND
- SDA to Arduino SDA (A4 on UNO, SDA pin on Nano/MEGA)
- SCL to Arduino SCL (A5 on UNO, SCL pin on Nano/MEGA)
Note: Multiple I2C devices can share the same SDA and SCL lines. If the display does not respond, run an I2C scanner sketch to find the module address (commonly 0x27 or 0x3F).
Library, Initialization and Example
Use the Wire and LiquidCrystal_I2C libraries in the Arduino IDE. Example initialization:
#include <Wire.h>
#include <LiquidCrystal_I2C.h>

LiquidCrystal_I2C lcd(0x27, 16, 2); // replace 0x27 with detected address

void setup() {
  lcd.init();
  lcd.backlight();
  lcd.setCursor(0, 0);
  lcd.print("Hello, Arduino");
}

void loop() {
  // update display with sensor data
}
This example shows basic initialization, turning on the backlight, and writing text. Replace the I2C address and dimensions if needed.
Applications
- Real-time sensor data display (temperature, humidity, pressure)
- IoT dashboards and local monitoring panels
- Menu-driven user interfaces for projects
- DIY electronics and educational kits
- Prototype status and debug displays
Tips and Troubleshooting
- If the screen is blank, adjust the contrast potentiometer on the I2C adapter.
- Run an I2C scanner sketch to confirm the module address if initialization fails.
- Ensure correct voltage levels (5V vs 3.3V) to avoid damaging the module.
- Check that SDA and SCL lines have proper pull-up resistors; many adapter boards include them onboard.
- Use the correct LiquidCrystal_I2C constructor parameters for 16×2 or 20×4 displays.
Technical Specifications
- Interface: I2C (2-wire SDA, SCL)
- Compatible LCDs: 16×2, 20×4 (HD44780 compatible)
- Typical I2C addresses: 0x27, 0x3F
- Adjustable contrast via potentiometer
- Supported libraries: Wire, LiquidCrystal_I2C
Note: Images are for illustration purposes only.







Reviews
There are no reviews yet