
Overview
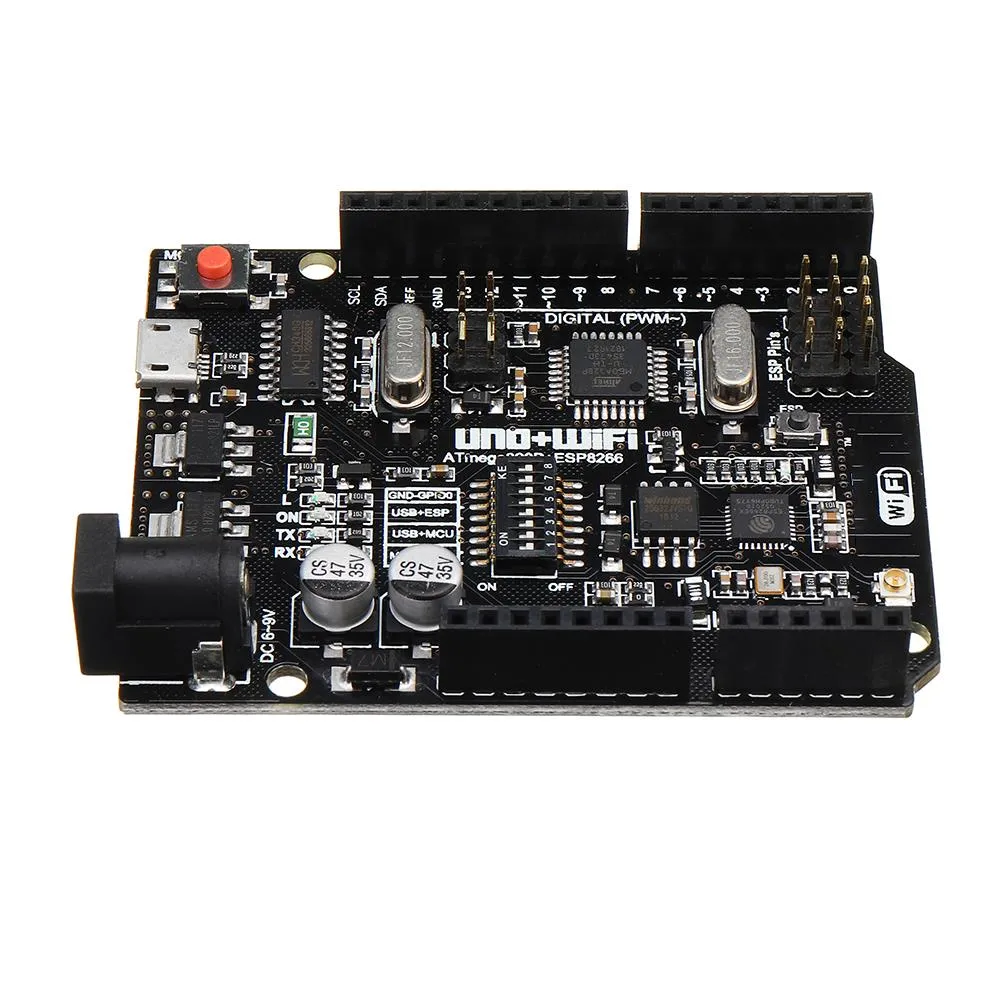
The Arduino Uno R3 Wi-Fi Development Board (ATmega328P) combines the familiar Uno R3 form factor with an integrated ESP8266 Wi-Fi module, providing an all-in-one platform for developing connected projects. This board is ideal for makers, students, and engineers building Internet of Things (IoT), smart home, and wireless sensor applications without adding extra Wi-Fi hardware.
Key Features
- ATmega328P microcontroller with Arduino Uno R3 compatibility
- Onboard ESP8266 Wi-Fi module for wireless connectivity
- 14 digital I/O pins (6 with PWM), and 6 analog inputs
- Supports UART, SPI, and I2C communication interfaces
- Micro-USB port for easy power and programming
- Operates at 5V logic and provides 3.3V and 5V power output pins
- Reset button, power LED indicators, and full compatibility with most Uno R3 shields
Technical Specifications
- Microcontroller: ATmega328P
- Wi-Fi: Integrated ESP8266 module
- Digital I/O: 14 pins (6 PWM outputs)
- Analog Inputs: 6 channels
- Communication: UART, SPI, I2C
- Operating Voltage: 5V logic
- Power Output Pins: 3.3V and 5V
- Programming/Power: Micro-USB port
- Extras: Reset button, power LED indicators
Compatibility and Software
The board is fully compatible with the Arduino IDE and most libraries designed for the Uno platform. You can program the ATmega328P using standard Arduino sketches, and use the ESP8266 module for network connectivity using common Wi-Fi libraries. The board retains the standard Uno R3 pinout, so shields and accessories that fit an Uno will typically work without modification.
Tips for setup
- Install the latest Arduino IDE and the ESP8266 board definitions if you plan to program the Wi-Fi module directly.
- Use the micro-USB port for both power and uploading sketches.
- Confirm voltage requirements of attached sensors and shields; the board provides both 3.3V and 5V outputs.
Typical Applications
- Internet of Things (IoT) devices and gateways
- Smart home automation and remote control
- Wireless sensor networks and data logging
- Educational projects, robotics, and prototyping
- DIY projects requiring built-in Wi-Fi
Getting Started
- Install the Arduino IDE on your computer.
- Connect the board to your PC with a micro-USB cable.
- Select the correct board and COM port in the IDE.
- Upload a basic Blink or Wi-Fi example to verify functionality.
- Integrate sensors, actuators, or shields as needed for your project.
What is Included
- 1 x Arduino Uno R3 Wi-Fi Development Board (ATmega328P)
- Documentation and quick start guide (may vary by supplier)
Additional Notes
This board is supplied by different manufacturers and the appearance may vary slightly between batches. Check documentation for any manufacturer-specific details before integrating into a final design.
Note: Images are for Illustration Purposes. Actual product appearance may vary slightly depending on the batch or manufacturer.


Malaika . (verified owner) –
Malaika . –