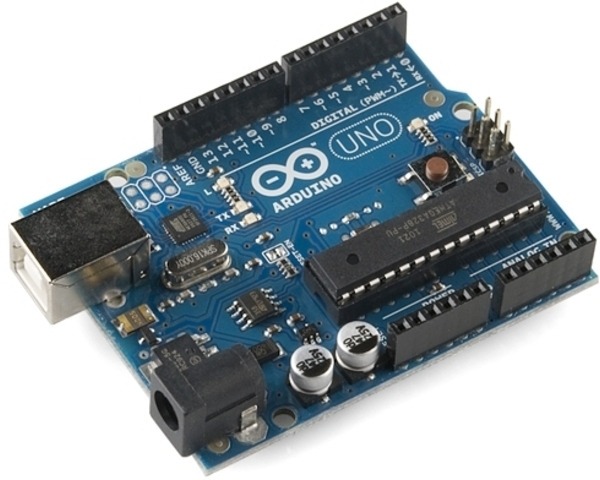
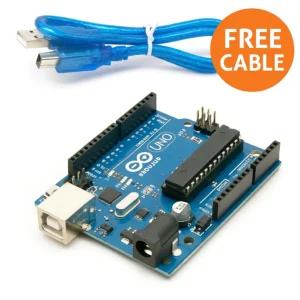
Arduino Uno R3 DIP Board Overview
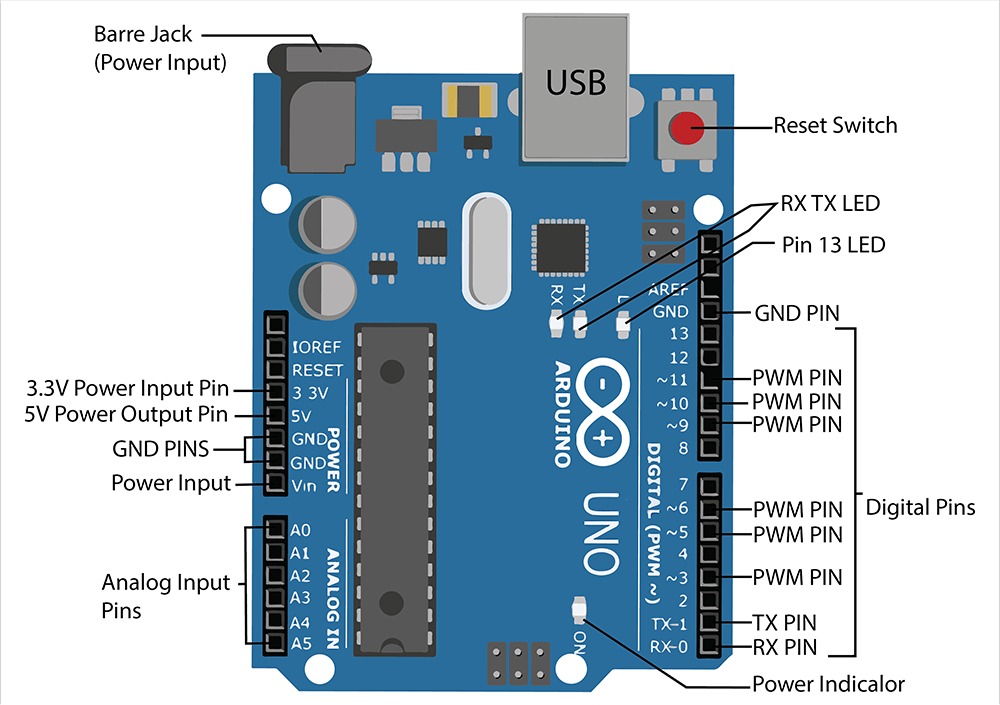
The Arduino Uno R3 DIP board with free USB cable is an entry-level Arduino development board built around the ATmega328P in a Dual In-Line Package. This DIP version makes the microcontroller easy to replace and ideal for learning, repair, and prototyping. It is fully compatible with the Arduino IDE and most Arduino Uno R3 shields and tutorials.
Key Features
- ATmega328P Microcontroller (DIP type) – removable and beginner-friendly
- USB Type B interface included – free USB cable for immediate programming and power
- 14 Digital I/O pins (6 PWM) plus 6 analog inputs for sensors and actuators
- 16 MHz clock speed and 32 KB flash memory for sketches and libraries
- Stable 5V operating voltage with recommended 7–12V input via the barrel jack
- Compatible with the Arduino IDE, official libraries, and community examples
Technical Specifications
- Microcontroller: ATmega328P (DIP version)
- Operating Voltage: 5V
- Input Voltage (recommended): 7-12V
- Digital I/O Pins: 14 (6 with PWM)
- Analog Inputs: 6
- Clock Speed: 16 MHz
- USB Type: B (included)
- Flash Memory: 32 KB
- Dimensions: 68.6 mm x 53.4 mm
Why Choose the DIP Version
The DIP ATmega328P lets you remove and replace the microcontroller without soldering. This is a big advantage for learning, classroom use, or when developing projects that may require a replacement MCU. You can experiment freely and swap chips if you need to restore a board quickly.
What You Can Build
- Basic tutorials like Blink, Button, and Analog Read
- Sensor projects: temperature, humidity, light, and gas detectors
- Robotics: motor control, servo projects, and simple autonomous robots
- Home automation: relays, switches, and timed control systems
- IoT prototypes when paired with Wi-Fi or GSM modules
Getting Started – Simple Steps
- Connect the included USB Type B cable from the board to your computer.
- Install the Arduino IDE from the official Arduino website.
- Select the Arduino Uno board and the correct COM port in the IDE.
- Open the Blink example, compile, and upload to test the board.
- Explore sensors, shields, and libraries to expand your project.
What is Included
- 1 x Arduino Uno R3 DIP board (ATmega328P installed)
- 1 x USB Type B cable (included free)
- Quality-checked and packed by Colgroad
Quality and Support from Colgroad
Colgroad works with trusted Arduino Uno R3 suppliers and tests each board for quality before shipping. We provide responsive customer support, careful packing, and fast delivery across Pakistan. Whether you are buying for school, a lab, or home projects, Colgroad aims to make your Arduino journey easy and reliable.
Start Creating Today
Bring your ideas to life with the Arduino Uno R3 DIP board with free USB cable. Buy now at Colgroad.com for fast delivery and great value. Note: Images are for illustration purposes only.
Only logged in customers who have purchased this product may leave a review.

Afaq (verified owner) –
Afaq –
Anonymous (verified owner) –
Anonymous –
steve cloutier (verified owner) –
steve cloutier –