Interfacing Arduino with DHT11 Sensor
Interfacing Arduino with DHT11 Sensor is an ideal beginner-friendly project for collecting reliable environmental data. The DHT11 is a low-cost digital sensor that measures both temperature and humidity and integrates easily with 3.3V or 5V Arduino boards. Use it for weather stations, home automation, greenhouse monitoring, data logging, and IoT prototypes.
Key Features
- Measures temperature (°C) and relative humidity (%).
- Operates on 3.3V to 5V power supply.
- Digital one-wire data output for easy interfacing.
- Pre-calibrated sensor for stable readings.
- Compact size and low power consumption.
- Supported by popular Arduino libraries for quick coding.
- Suitable for IoT, weather monitoring, automation, and education.
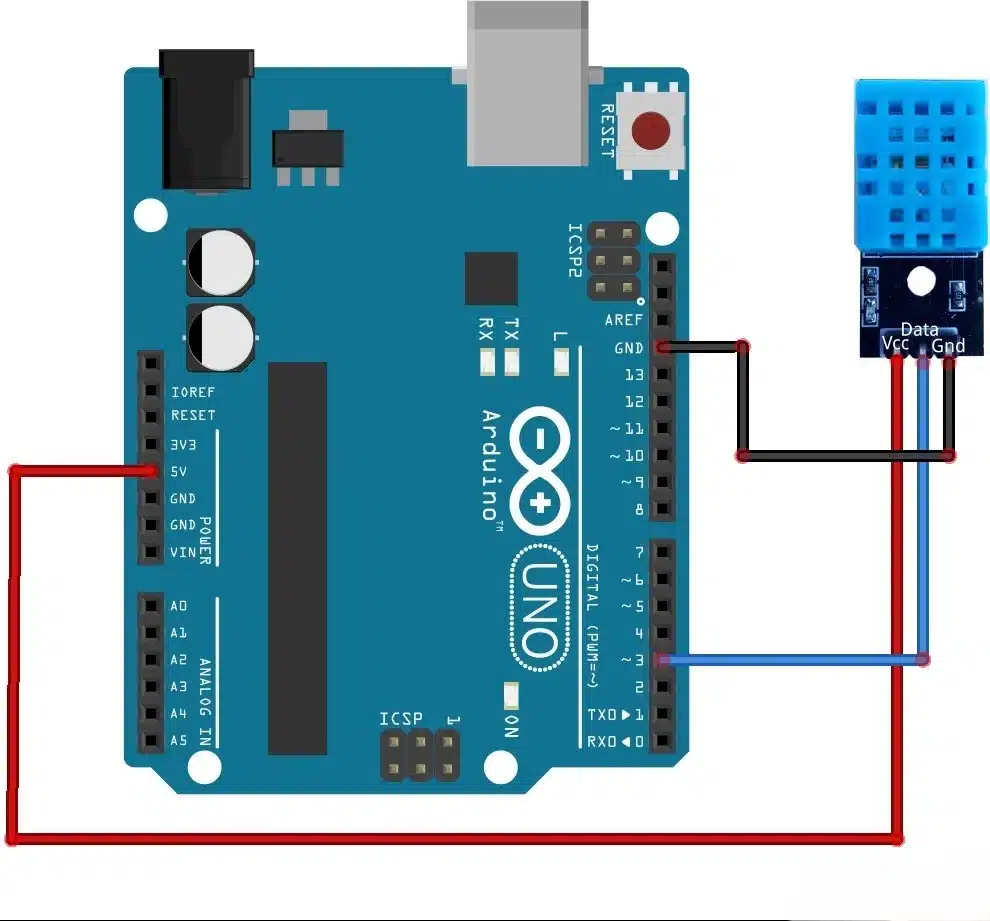
Wiring and Connections
- VCC: Connect to 3.3V or 5V on the Arduino.
- GND: Connect to Arduino ground.
- DATA: Connect to a digital I/O pin (for example D2) with a 4.7k to 10k pull-up resistor between DATA and VCC.
Recommended Arduino Libraries
- Adafruit DHT sensor library (widely used and maintained).
- DHT sensor library by other community contributors for alternative examples.
- Install via Arduino Library Manager and include the example sketches to get started fast.
Basic Usage and Tips
- Read sensor data at sensible intervals (typically 1 to 2 seconds or more) to avoid sensor timeouts.
- Use the library example sketch to print temperature and humidity values to the Serial Monitor or display on an LCD/OLED.
- Calibrate your setup by comparing readings to a trusted thermometer/hygrometer for critical applications.
- Keep the sensor away from direct heat sources and water splashes; DHT11 is not waterproof.
Applications
- Home automation climate control and alerts.
- Weather stations and microclimate monitoring.
- Greenhouse humidity and temperature tracking.
- IoT environmental data logging and dashboards.
- Educational Arduino projects for students and beginners.
Troubleshooting
- No data or garbage values: check wiring, ensure pull-up resistor is present, and confirm correct digital pin in code.
- Erratic readings: allow sensor warm-up time and avoid rapid consecutive reads.
- Communication errors: confirm library version compatibility and try different example sketches.
Why Choose This Project
This Arduino and DHT11 setup provides an inexpensive, low-power solution to gather environmental data quickly. It is beginner friendly, supported by many Arduino libraries and community examples, and works across a range of Arduino boards powered at 3.3V or 5V. Whether building a simple weather station, automating home climate control, or learning embedded systems, this project is a reliable starting point.
Getting Started in 3 Steps
- Wire the DHT11 to your Arduino (VCC, GND, DATA with pull-up resistor).
- Install a DHT Arduino library via Library Manager.
- Upload the example sketch and open Serial Monitor to view temperature and humidity readings.
Note: Images are for illustration purposes only.


Reviews
There are no reviews yet